
A floating pickup for an old Maton Alver
This was a fun little project. Repairing, building and setting up guitars is A LOT of fun and after doing it for over a quarter of a century I still find it fascinating and stimulating. Every guitar is different. You can setup 3 seemingly identical guitars in a row and all will be different. That's one of the things we love about them.
While building guitars is pretty much a free for all for me and lets me do pretty much whatever I want, most repairs and mods are limited to either what the customer wants and/or what the guitar needs or deserves so when Tone dropped this off and I said "send me a design for the scratchplate" thinking he'd want it kinda "Matonesque", and he said "do whatever you want. I want a bit of Tym in there" my brain started spinning.
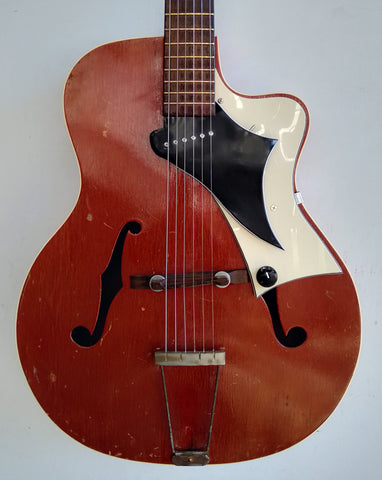
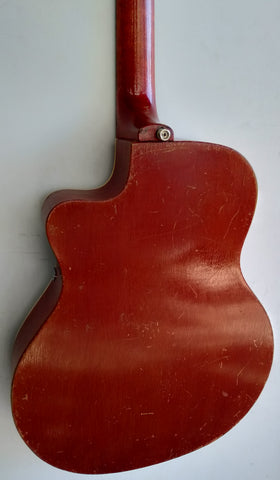
The Alver was a budget acoustic guitar made by Maton in the 50's and 60's and was a lot of aspiring young Australian guitarists first "proper" guitar. They're an arched top full acoustic made completely of ply with the back being almost flat. The top has single ply binding and 2 F holes with a typical floating bridge and trapeze tailpiece common in the day. The one piece set neck on this one appears to be Queensland maple and is slim and comfortable with no trussrod. The fretboard has simple dot markers and brass frets and the open gear strip tuners have plastic buttons. Everything you'd expect from an entry level acoustic made by a reputable and experienced guitar manufacturer.
While Maton did offer floating pickups for some models this Alver originally would have had a simple plastic scratchplate held on with the usual angled bracket and screw under the neck, which were the only 2 holes I had to attach whatever it was I was going to make.
Tone said I could drill extra holes or do whatever was necessary but I set myself the goal of making no mods to this original old acoustic which is still in pretty good condition.
So, with that in mind I sat down with a pen and paper and a couple of books on vintage Japanese guitars and started dreaming of a scratchplate.

I had wound one pickup after Tone sent me the string height before I got the guitar but once I had it I realised I needed to make a lower profile pickup if I was going to build what I wanted. This pickup was wound with #43 wire and was medium high output. I made another shorter bobbin and wound another coil with #44 as I had less room and still wanted a bit of output. I had a definite "idea" about what I wanted to make, I just had to fit it into the design.


I wound the second coil to just over 10,000 turns which gave me almost 13K output. I had decided to use C8 bar magnets to keep the pickup as clear as possible and have lots of punch. I knew Tone wasn't adverse to ceramic magnets (why would you be?) as he loves G&L and early DiMarzio pickups.
All of this pickup assembled to give me enough room to make what I had planned as far as the plate, or plates went.

I wanted to make a double plate with contrasting effects and like I said, only use the original 2 mounting holes. This meant making the bottom plate bigger to attach with these holes, and then "mounting" the top plate, with the pickup integrated, onto the bottom plate. This of course meant TWO scratchplate thicknesses as well as the pickup.

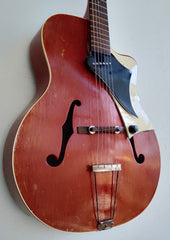
I messed around with some designs. Some more .... conservative or traditional, and some, well, more like this. The original pickup had a string spacing so the pickup was vertical like most guitars but when I made the second bobbin I thought "why not throw a bit of Mosrite in there" and angle the neck pickup? This meant a slightly wider pole piece spacing of course.

With the limit of having only 1 pot (knob) I thought I'd add a 3 way tone switch under the top plate top give Tone more options. With the high output, ceramic pickup being so ... clear I thought I'd add an option for straight through, a little top rolled off, and then a little more. It doesn't go down to full tone rolled off but if Tone needs that I can change it to suit. I also added a treble bleed circuit on the pot to keep it all "clear" as he rolls the volume off.


I removed the original plastic strap button and fitted an output jack button which could be earthed to the tailpiece. This was the only "mod" I had to do by drilling the hole slightly bigger but it can be reversed and covered by the original button if desired.

With both plates cut and finished I "formed" the top plate a little with heat so it didn't sit up so high off the body and then glued it all together.

I'm really happy with how this turned out, both aesthetically and sonically. It was nice that Tone trusted me and was fun to have free reign on the design of both plates and pickup. I hope I did them both justice.