Fender Jaguar bridge and "vibrato"
Share
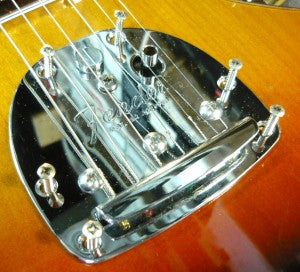
This story is about the wrongly accused bridge and the wrongly named tailpiece as used on the Fender Jaguar and Jazzmaster guitars.
Over the years there's been volumes written about these items. While I've read some through what I do, I don't belong to or read forums and message boards so if I'm repeating "common law" here, carry on as you were.
Personally I think these two pieces of hardware are very underrated and wrongly accused of problems and issues that aren't their fault at all. When set up and adjusted properly, they are, to me, the best vibrato and bridge set up Fender ever designed and used. I use these standard bridges on all my offsets except one. I use a Bigsby aluminium bridge on one of my JM's purely as an experiment.
This particular one had some issues that are common on these units if not looked after or serviced properly. This is a Japanese guitar, but US ones are very similar.
The first issue is with the VIBRATO. Yes, vibrato, not Tremolo as Fender wrongly calls all their tailpieces. Vibrato is a change in pitch, tremolo is a change in volume. These don't change the volume, hence vibrato.
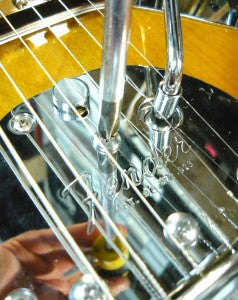
You can see here how the plate that the arm attaches to has "fallen in" under the mounting plate which basically renders the unit next to useless. This is an easy fix for anyone out there with a few simple tools and a little bit of nous.
You just have to remove the six screws that attach the unit to the guitar body. Take the tension off the strings first of course.
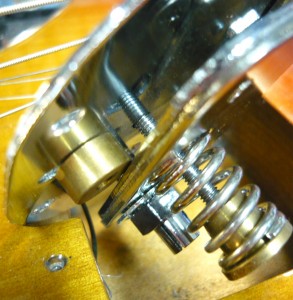
Take the whole unit out of the rout and check what's loose. There are several things to tighten here and on this case, all were loose.
The whole unit relies on the tension of the strings to pull the pivot plate up against a "blade" and the tension of this is adjustable.
This one had become so loose the "Trem-lock" mechanism had slipped under the pivot plate and nothing worked.
The screw with the spring adjusts the tension on the unit and can be adjusted from the top without removing the unit however this one needed more work than just a quick adjustment.
This is what it should look like. Here the tension adjustment, the trem lock slider and the arm sleeve have all been tightened.
The arm fits in with an interference fit into a tube with four slots cut in it and "crimped" to hold the arm in place. This piece comes loose if the arm is used heavily and the whole thing must be removed to fix this.
The "trem-lock" slider is also threaded and needs to be tightened to stop it sliding around. It has a nylon washer under it to help it move.
With the whole thing back together tightly it's time to put it back on the guitar. Don't forget to fit the earth wire back so that the tailpiece touches the wire. This earths your strings.
Just put it all back in place and tighten up the six screws into the body. DONE.
Now the bridge.
This bridge gets a really bad wrap and it shouldn't. Set up properly, it works VERY well and to my ears, sounds better than any other option I've heard, including expensive aftermarket replacements.
One of the problems with this bridge is it has very little tension to hold down the strings onto the saddles. It's even worse on the Jag as the shorter scale length means less string tension than the Jazzmaster. The thing is, set up properly, it's a great bridge and all you need to do it all is a philips head screwdriver and the correct size allen key.
Some of the other main issues that effect this bridge are because of bad set ups they tend to rattle and loose sustain. This is actually easily fixed and only takes a rudimentary glance to see why this happens.
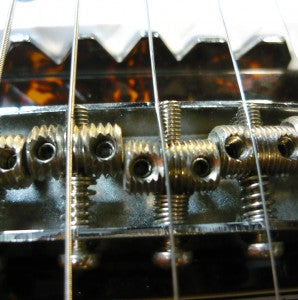
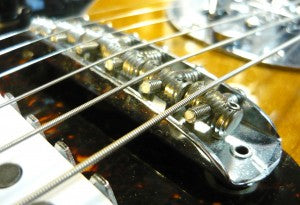
As you can see from the close up pic here and above the saddles are adjusted wrongly and cause the strings to hit the adjusting screws (and sometimes the bridge itself) causing buzzing and sustain issues.
This bridge can be adjusted in three ways (as apposed to two with the tune-o-matic) and is quite an engeinious design. You can not only adjust overall height and intonation, like the Gibson bridge, but also individual string/saddle height and therefor radius. You can also adjust the string spacing by moving the strings to a different slot in the threaded saddle. Amazing.
Most people just get the height "about right" with the two outside adjusters and then set everything with the saddles. What this inevitably ends up doing is making some of the strings hit either the bridge (on the outside strings) or the screw adjusters (on the middle strings) either of these problems will cause issues.
The correct way is a bit of a balancing act but well worth the time. You must balance the height of the saddles and bridge together. I usually set the two E string saddles at just above the edges of the bridge. Then set the radius with the other saddles and then set the overall height. If you have issues with anything interfering then adjust to suit. You WILL be able to set this bridge so nothing fouls with this method.
With everything set right it will look like this with the strings clearithe both the bridge edges and the saddle screws.
I always shim the neck on an offset before starting anything else on a set up. You want to kick that neck up slightly and put more angle on it to raise the bridge and put more string tension on it. Jazzmasters don't need much encouragement here whereas Jags can sometimes use a little more, depending on string gauge and tuning.
With good string tension and the bridge set up properly, there's no reason why this bridge can't work properly. I personally prefer the tone this bridge gets over a Mustang, which is a common conversion as it drops straight in (with some radius issues on certain models) and works infinitely better than a Tune-o-matic, especially if you intend to use the vibrato a lot.
There are expensive aftermarket bridges available now that while sounding good, are, in my opinion completely unnecessary when the original is delt with properly.
My least favorite "mod" is the Buzz Stop. A mechanism that attaches to the front two screws of your vibrato and has a roller for holding the strings down and putting tension on the bridge. The main problem with these is that put TOO MUCH tension on the bridge and completely change the tone and playability of the guitar.
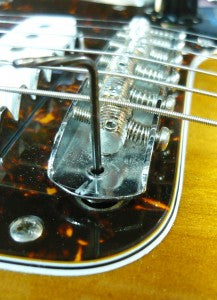
With everything (string wise) set up properly you can easily adjust the tension of your vibrato with a screwdriver from the top between the D and G strings.
Like I said, set up and looked after properly, this is my favorite Fender bridge and tailpiece. The vibrato is more fluid than any other Fender Vibrato and while not for "divebombing" works extremely well at what it was designed to do. The bridge has adjustment in every direction possible and works very well with a vibrato, letting the strings slide well over it's saddles. With the angles and tensions right, this is a GREAT set up. What's not to like ?


