
Yamaha headstock repair
Well, this could just be the worst attempted repair I've EVER seen. This old Yamaha acoustic came into my repair shop like this. The customer looked VERY sheepish and said "I'm embarrassed to show you what I did, but I need it fixed". I said my usual "I bet I've seen worse" ........... well, I was wrong.


This repair had been done after what looked like another attempt that obviously didn't hold. The headstock had broken badly and was stuck back together with, I'm pretty sure, liquid nails. The break itself would have been pretty easy to fix if this attempt, and what followed hadn't been attempted, but sometimes these unsuccessful repairs can make my job harder as you basically need to reverse the bad repair and try and get back to the raw break, and then start again.
The liquid nails wasn't the only problem here. The customer had also, after realizing that the nails wasn't going to "hold", screwed a series of screws straight into the timber of the neck which had in fact weakened the timber as they did not grab, and caused the timber to split. So this needed to be reversed as well.

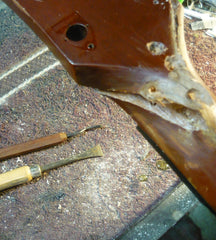
Getting everything apart and the screws out it was obvious this was going to be a big job. The screws had damaged the timber badly and the liquid nails had dried rock hard with everything in the wrong place. I needed to get the nails out of every part of the cracks if I was going to get a good surface to repair. I tried a lot of different methods and chemicals to soften the nails and ease it back out but nothing seemed to work ? This was going to be a matter of scraping the old glue out of every nook and cranny, including the truss rod and channel before I could even attempt to see if it was all going to line back up again.
This was a time intensive job and I basically did it a little bit a time when I was "in the mood".


With the liquid nails all out of the cracks I now had a very flakey and hairy surface on all the cracks but the headstock seemed to line up pretty nicely. I still had the issue of the screw damage to the timber but this is where the attempted repair worked in my favour, slightly. He hadn't pre-drilled the holes for the screws. Just screwed them in so I was lucky in that the timber from the screw holes was still mostly there, just crushed and pushed aside. So I carefully steamed the timber back out until nearly all the screw holes had expanded back into it's original position. There was of course still screw holes evident, but the holes had closed probably 80% of the way after several weeks of steaming and drying.


So with the cracks clean, and the holes "mostly" gone it was time to re-glue the break. I used epoxy on this repair as I wanted maximum strength and was trying to avoid putting splints in as the repair was going to start costing more than the guitar was worth. I glued it up and left it in the jig for about 3-4 days. Once out of the jig it was actually looking pretty good without too much residual damage from missing timber.


The repair seemed pretty solid. I always "try" and break these after fixing them because if they move or break easily afterwards, they weren't going to hold anyway. I cleaned up the repair and decided that it would look best with a "burst" of black just to cover up the damage and make it look (and feel) a bit better.
With a few coats of black and a coat of clear it was sealed and looking OK. I strung it up and played it. It sounded ........ great. I left it strung up, checking it each day for movement and tuning and after about a week it hadn't moved at all. It was solid as a rock and looked OK, considering what had come in.


I'm glad I could rescue this guitar at a pretty decent price. The owner said it had real sentimental value and really waned to save it if possible. Well, like I say, I still haven't seen a guitar that can't be fixed. It's just a matter of how much you need it fixed.